

My current obsession is pickling. I want to pickle EVERYTHING! The Mindful Daddie and I made these pickled green beans one week into our 4-Week Clean Eating Cleanse. They sit for 3 weeks in the fridge before they are ready to enjoy, so our plan was to throw them into some spicy bloody mary’s as our reward for completing the cleanse. They are crisp, delicious, and totally worth the wait!! As I mentioned, they are perfect for bloody mary’s, but they are equally good by themselves as a snack.
Ingredients:
- 2 1/2 pounds fresh green beans
- 2 1/2 cups distilled white vinegar
- 2 cups water
- 1/4 cup Himalayan pink salt
- 3 cloves garlic, peeled
- 1 bunch fresh dill
- 3/4 tsp red pepper flakes
- Jalapeno, sliced (optional)
Sterilize 6 jars (1/2 pint size) and lids. Keep jars hot. Trim green beans to 1/4 inch shorter than your jars.
In a large saucepan, stir together the vinegar, water and salt. Add garlic and bring to a rolling boil over high heat. In each jar, place 1 sprig of dill and 1/8 teaspoon of red pepper flakes. Pack green beans into the jars so they are standing on their ends. Top green beans with 2 slices of jalapeno, if desired).
Remove garlic from the liquid and ladle the boiling brine into the jars, filling to within 1/4 inch of the tops. Seal jars with lids and rings. Place in a hot water bath so they are covered by 1 inch of water. Simmer but do not boil for 10 minutes to process. Cool to room temperature. Test jars for a good seal by pressing on the center of the lid (it should not move). Place in refrigerator and let ferment for 3 weeks before eating. Enjoy!

The 4-Week Clean Eating Cleanse is over, and believe it or not, we really enjoyed the healthy dietary and nutritional changes that we made during the course of the past month! Now that we have cleansed our bodies and reset our digestive systems, we feel motivated to continue our healthy eating and exercise habits. We are prepared to make this a permanent lifestyle change, rather than a 4-week fad that ends with us falling back into our old habits. Our perspective on food has changed, and we now realize that much of what we had traditionally learned about “healthy eating” from the mainstream media is WAY OFF and can actually have a negative impact on our health!
We have seen and felt so many positive changes while on the cleanse. Here’s a quick list of what we’ve experienced:
- No afternoon slump where we feel like we need to take a nap between 2:30 and 4:00 pm.
- We stay fuller longer, and don’t feel the need to snack constantly between meals.
- Our meal portions have become smaller without us consciously making them smaller. We get fuller and completely satisfied off of less food (and we are not left with the feeling of wanting more).
- Less frequent bloating, gas, and other yucky tummy troubles.
- We feel energized after we eat, as opposed to feeling like we are in a “food coma,”
- Increased motivation to exercise.
- We have learned to love the process of preparing and cooking our food, and are excited to plan our weekly menu!
As an added bonus, I lost 8 pounds and the Mindful Daddie lost 11 pounds over the course of the 4-week cleanse. So not only are we feeling more vibrant and energized, but our clothes look and fit better too! Woo woo!
So what are we going to do now that the cleanse is over? We are going to continue to eat (mostly) according to the cleanse rules Monday through Friday, and we are going to enjoy ourselves on the weekends by treating ourselves to a meal or 2 at restaurants. I say “mostly” because we are planning on incorporating some dairy back into our diet. This will come in the forms of grass-fed butter and cheese, and organic whole milk. We are going to give raw dairy a try because it has some amazing health benefits! Look for a post on raw dairy in the near future!
We will also be giving bulletproof coffee a try, and enjoying the occasional glass of wine or frosty mug of beer. Everything in moderation, right?
I strongly encourage you to give this cleanse a try. I promise you will experience positive, life-changing results and that you will learn to think about food in a completely different way!

I had some leftover roasted garlic and wanted to make sure that these little golden nuggets didn’t go to waste! Here’s a flavor-rich soup that would be perfect on a cold winter day! I paired it with gluten-free biscuits, but this soup can definitely hold its own as a main dish!
Ingredients:
- 4 15 ounce cans of cannellini beans, drained and rinsed
- 3 large heads of garlic, roasted and peeled (I use the Pioneer Woman’s method)
- 12 fresh sage leaves, chopped
- 3 tbsp chicken Better Than Bouillon
- 6 cups water (add more or less depending on how thick you like your soup)
- Pinch or 2 of white pepper
In a large stock pot, place beans, garlic, sage, Better Than Bouillon, and water. Stir to combine all ingredients, and bring to a boil. Once soup is boiling, turn heat down to simmer and blend all ingredients together using an immersion blender. Continue to simmer for 10-15 minutes to allow the flavors to meld together. Stir in white pepper and serve hot. You can also add salt if needed. Enjoy!
Tip: You can use organic low sodium chicken broth in place of the Better Than Bouillon and water, if you like. Start with 1 1/2 quarts, and add more if you want to thin out your soup.

This hummus was a hit at the Super Bowl party we went to today. It goes great with my recipe for Brown Rice Tortilla Chips! This would also make the perfect spread for a sandwich or wrap. Making hummus is so easy…I don’t think I’ll ever go back to buy store-bought again!
Ingredients:
- 2 cans of garbanzo beans, drained
- 3 tbsp tahini
- 6 tbsp organic extra virgin olive oil
- 3/8 cup warm water
- 1 1/2 large heads of roasted garlic (I followed The Pioneer Woman’s method)
- 1 1/2 lemons, juiced
- 1/4 tsp Himalayan pink salt
- Flat leaf parsley, chopped (optional)
- Paprika (optional)
Squeeze roasted garlic into a food processor or Vitamix. Add beans, tahini, oil, water, lemon juice, and salt, and blend until smooth. Place in a bowl for serving, drizzle olive oil on top and sprinkle with paprika and parsley, if desired. Enjoy!

I wanted to make something different than a green salad to serve with dinner, and this is what I came up with! Sugar plum tomatoes are firm, sweet, and juicy and can definitely be more than just a salad topper. This recipe is a little tangy and a little sweet, so it makes a nice side if you are serving up a super savory main dish!
Ingredients:
- 4 cups sugar plum tomatoes, halved
- 1/4 cup extra virgin olive oil
- 2 tbsp organic raw apple cider vinegar
- 2 tbsp balsamic vinegar
- 1 tsp dried parsley
- 1 tsp dried oregano
- 1 tsp dried basil
- 1/4 tsp Himalayan pink salt
- 1 1/2 tsp xylitol
Place tomatoes in a large bowl.
In a small bowl, mix the oil, vinegars, salt, xylitol, parsley, oregano, and basil. Pour over tomatoes and mix gently until the tomatoes are well coated. Cover and refrigerate for at least 2 hours. When ready to serve, toss gently to re-coat the tomatoes. Enjoy!

I am a big fan of pesto! It’s so fresh, flavorful, and surprisingly easy to make! The sun-dried tomatoes add a nice sweetness to the pasta, and the simple flavors of the chicken let you savor the star of the show: the pesto! This pesto uses nutritional yeast flakes in place of parmesan cheese to make it dairy-free, but feel free to use cheese if you eat dairy.
Pasta and Chicken Ingredients:
- 1 package brown rice pasta (I prefer fusili because it holds the pesto nicely)
- 1/2 cup sun-dried tomatoes, thinly sliced
- 2 tbsp pine nuts, toasted
- 2 chicken breasts
- Grapeseed oil cooking spray
- Extra virgin olive oil
- Himalayan pink salt
- Garlic powder
- Ground pepper
Prepare pasta according to package directions. Spray pan with grapeseed oil cooking spray and heat over medium heat. Rub chicken breasts with olive oil to coat, and sprinkle both sides with salt, pepper and garlic powder. Place in hot pan, and cook 7 minutes each side or until cooked all the way through. Remove chicken from pan and slice. Slice sun-dried tomatoes and set aside. Toast pine nuts in a small dry pan and set aside.
Pesto Ingredients:
- 1/3 cup extra virgin olive oil
- 3 tbsp pine nuts, toasted
- 3 cloves of garlic
- 1/2 small lemon, juiced
- 3/4 cup basil, packed
- 1/2 cup spinach, packed
- 1/4 cup arugula, packed
- 1/2 cup nutritional yeast flakes
- Himalayan pink salt, to taste
In a food processor or Vitamix, combine all ingredients except for salt. Blend to a smooth consistency, and salt to taste if needed.
Coat pasta with about 1/2 of the pesto sauce (or more if you prefer). Add the pine nuts and sun-dried tomatoes and stir pasta to mix. Scoop pasta onto plates and top with sliced chicken breasts. Enjoy!
Tip: You can freeze your leftover pesto sauce in an airtight container, or you can store it in the fridge and use it to make another yummy dish within the next 3-4 days!

I’ve been wanting to make a really great, healthy trail mix for a while now…and I finally did it! I gathered a dream-team of ingredients and put them together to make a snack that has a little bit of everything: crunchiness, sweetness, tartness, and chewiness. More importantly, it is chock-full of superfoods that will do amazing things for your brain and body! So treat yourself to this healthy delight!
Ingredients:
- 1 cup raw almonds
- 3/4 cup roasted, unsalted cashews
- 1/2 cup raw pepitas, toasted
- 1/2 cup raw sunflower seeds, toasted
- 1/2 cup raw pistachios, toasted
- 1/2 cup dried cranberries
- 1/4 cup goji berries
- 1/4 cup mulberries
- 1/4 cup raw cacao nibs
Combine all ingredients and enjoy!

We had some left-over Mahi Mahi from the fish tacos we made last night for Taco Tuesday. The Mindful Daddie said he was in the mood for a salad, so I came up with this recipe to make the fish and salad work together! It’s a twist on the classic Chinese Chicken Salad with a dressing so good that it might make you want to lick your salad bowl! The recipe below makes 2 large servings.
Salad Ingredients:
- 4 cups green cabbage, thinly sliced
- 2 cups red cabbage, thinly sliced
- 1 cup shredded carrot
- 2 green onions, thinly sliced
- 1 11-oz. can of mandarin oranges in water, drained
- 1/4 cup cilantro, chopped
- 1/4 cup slivered almonds, toasted
Place all ingredients in a large bowl and mix to combine.
Fish Ingredients:
- 1 large Mahi Mahi filet, patted dry
- 2 cloves garlic, minced or crushed
- 1/2 tsp Himalayan pink salt
- 1/2 tsp ginger, peeled and minced
- 1 tbsp orange juice
Combine garlic, salt, ginger, and orange juice in a smal bowl and brush onto both sides of the fish. Place fish on grill at medium heat, cooking each side for 4 minutes or until the fish flakes easily with a fork. Remove from grill and cut filet into 2 pieces.
Dressing Ingredients:
- 1/3 cup rice vinegar
- 1 tsp minced garlic
- 1 tsp minced ginger
- 2 tbsp organic extra virgin olive oil
- 1 1/2 tsp toasted sesame oil
- 2 drops dark liquid stevia
- 2 1/2 tsp peanut butter
- 1 1/2 tsp sriracha
Whisk all ingredients together in a small bowl. Pour into a salad dressing container and store in the refrigerator.
To serve, scoop salad into 2 large salad bowls. Dress the salads and top with the Mahi Mahi fillets. Enjoy!

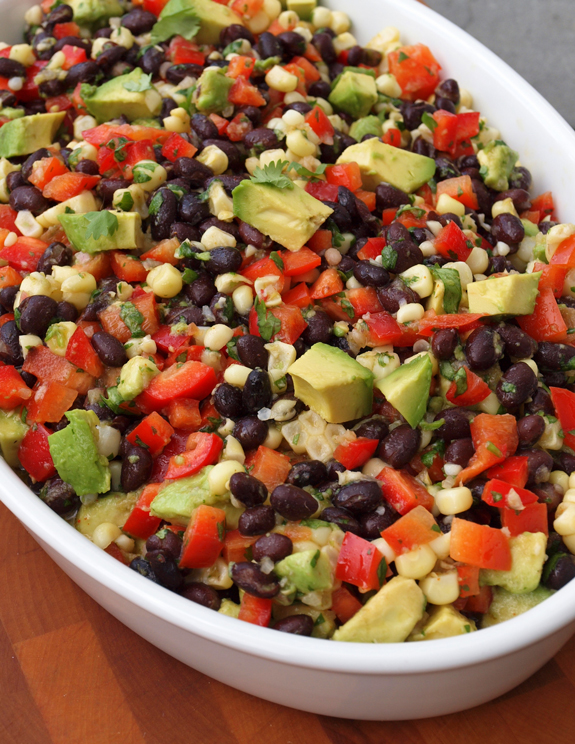
Tonight is Taco Tuesday at the Mindful Mommie house, and I am serving up this tasty black bean and corn salad as our side dish. It is super simple and full of fresh flavors! It also makes a super delicious lunch if you have leftovers. You can even top it with grilled chicken to make it a meal all on its own!
Ingredients:
- 1 can organic black beans, drained and rinsed
- 1 can organic corn, drained and rinsed
- 1/4 of a red onion, chopped
- 1/4 of a red bell pepper, seeded and chopped
- 1/2 a jalapeno, diced
- 1 handful of cilantro, chopped
- 1 large lime, juiced
- 2 tbsp organic extra virgin olive oil
- 1 1/2 tsp cumin
- Salt and pepper, to taste
- Avocado, for topping (optional)
Mix all ingredients in a bowl and refrigerate for at least 1 hour to allow flavors to blend together. When ready to serve, top with avocado. Enjoy!

A few people have been telling me that health food stores can be intimidating, and I agree! I felt totally lost at first. There were so many ingredients and items that I had never heard of, not to mention the aisles of bulk bins! So here is a little “cheat sheet” to get you started!
Oils and Vinegars
- Organic extra virgin olive oil
- Organic coconut oil
- Organic grapeseed oil
- Grapeseed oil cooking spray
- Coconut oil cooking spray
- Flax oil
- Toasted sesame oil
- White vinegar
- Balsamic vinegar
- Organic raw apple cider vinegar
- White wine vinegar
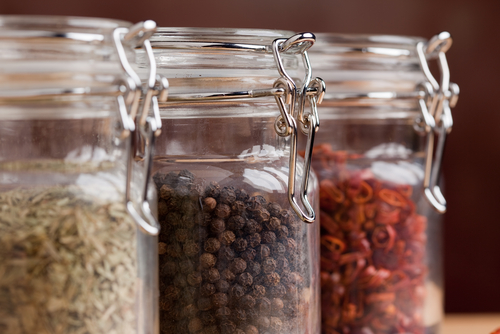
Spices
- Celtic sea salt
- Himalayan pink salt
- Pepper
- Black peppercorns
- Chili powder
- Curry powder
- Garlic powder
- Onion powder
- Ground mustard
- Mustard seeds
- Cumin
- Tumeric
- Paprika
- Cinnamon
- Crushed red pepper flakes
- Cayenne
- Ground Coriander
- Coriander seeds
- Celery seeds
- Dried basil
- Italian seasoning
- Dried oregano
- Dried dill
- Dried parsley
- Dried thyme
- Dried parsley
- Dried rosemary
- Bay leaves
- Kelp granules
- Kombu
- Vanilla extract
Sweeteners
Items from the bulk bins
- Brown rice pasta
- Brown rice
- Quinoa
- Almond flour
- Pepitas
- Sesame seeds
- Sunflower seeds
- Flax seeds
- Dried cranberries
- Raisins
- Dates
- Raw almonds
- Red and green lentils
- Chia seeds
- Black beans
- Steel cut oats
- Nutritional yeast flakes
- Shredded coconut
Sauces and Broths
- Sugar-free marinara
- Fish sauce
- Hot sauces
- Mirin
- Worcestershire sauce
- BBQ sauce
- Low-sodium organic chicken broth
- Organic vegetable broth
- Organic turkey gravy
Beverages
- Coconut water
- Whey protein powder (for smoothies)
- Organic tea bags
Baking
- Baking powder
- Corn starch
- Gluten-free bread crumbs
- Gluten-free pancake mix
- Dry active yeast
- Xanthan gum
Snacks
- Homemade roasted almonds
- Homemade roasted chickpeas
- Homemade brown rice tortilla chips
- Seaweed snacks
- Mary’s crackers and pretzels
- San-J crackers
- Dried fruit
Cans and Jars
- Black beans
- Garbanzo beans
- Corn
- Tomato paste
- Wild tuna
- Roasted red peppers
- Sun-dried tomatoes
- Applesauce
- Tahini
I find that with these items on-hand, I can make just about any recipe I want to (in addition to the fresh produce I keep in the fridge). I always recommend buying everything organic, if possible, so that you can be guaranteed that your food is truly clean and free from harmful pesticides and other chemicals. I keep the items from the bulk bins in large mason jars, which is great for organizing and being able to see what you have available. As an added bonus, the jars also look really pretty!
Enjoy the shopping experience and take the time to learn about what you are buying. I promise you’ll find that after a couple of trips to your local health food store that you are navigating the aisles like a pro!
